


 Tile & miter box with basic shell of left bank tower.
 The Central span arches with basic components for comparison.
  The left bank tower & columns.
 *
Due to some glitch affecting my browser I was unable to update this blog yesterday. Whatever it was that caused Internet Explorer such angst seems to have cured itself, so, on we go.
*
Work has begun on the bridge for 17th century-plus wargaming. As mentioned before I'm using components made of the extremely tough Herculite 2 plaster cast in Hirst Arts molds for the majority of construction. As it happened I didn't need to make as many casts as I'd planned, as I have plenty of spare components in store that suit the project. To make it easier to transport the whole structure will be made in three separate parts comprising the two towers with side spans, and the wide central span. All will be mounted on bases made from two layers of thick card laminated with PVA and sealed with Klear/Future floor polish. MDF might be better in some ways but I find card easier to work with.
*
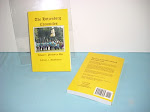
The top picture shows the beginning. A perfectly flat surface is essential for constructing buildings using the plaster blocks as any errors that creep in tend to become magnified as work advances. I use a spare ceramic wall tile for this purpose, and a miter box to ensure perfect 90-degree vertical angles for the walls. Legos are ideal for this job but I gave mine away long, long ago...
*
The blocks are glued together using PVA adhesive: Aleene's Tacky Glue is good too. Both types of adhesive allow some time for parts to be adjusted before they set. In the event of an error being noticed afterwards, the blocks can be soaked in water, separated, dried and re-glued without harm. Some of the components require sanding to remove the occasional irregularity where the plaster is poured into the mold but this is easily done. The irregularities can be avoided altogether using the techniques described on the Hirst Arts website. Each component is in multiples or fractions of inches, which makes it easy to calculate the number needed and the area they'll cover. The base shell of the left-bank tower is shown next to the miter box, and measures 5 inches long by 2 inches wide.
*
While this was drying I assembled the arches that will form the central span of the bridge. Bruce Hirst cleverly designed these components so they can make either 4-inch or 3-inch wide archways depending on their alignment. My span uses the 4-inch version here; 3-inch arches will be used in the tower gateways.
*
The smaller 2-inch wide arches shown in the lower photo are formed from 4 pieces, and will make up the two smaller spans between the towers and the central span. The photo shows two of the arches being checked in the dry assembly stage before gluing to the left bank tower. A roof made from thin card will arc between the tower and the pier on the right. Before this is fitted, I'll paint everything within the area to be enclosed as it'll be too difficult to do afterwards.
*
In the forefront I've shown two of the Gothic columns that will stand on the corners to the right of the arches. Although the photo doesn't show it that clearly, the finials are designed in the shape of heavily-bearded faces. I think it'll add a nice distinctive touch to the design, as they'll frown down at anyone passing under the bridge as if warning them to behave and respect the river!
*
Both towers will butt up to blue insulation foam terrain tiles sized to fit in with those used by the New Buckenham club. I'll make these last, and they'll have stone-flagged quaysides with bollards.


No comments:
Post a Comment